Colossal Monolith (Heart of Ruin)

About

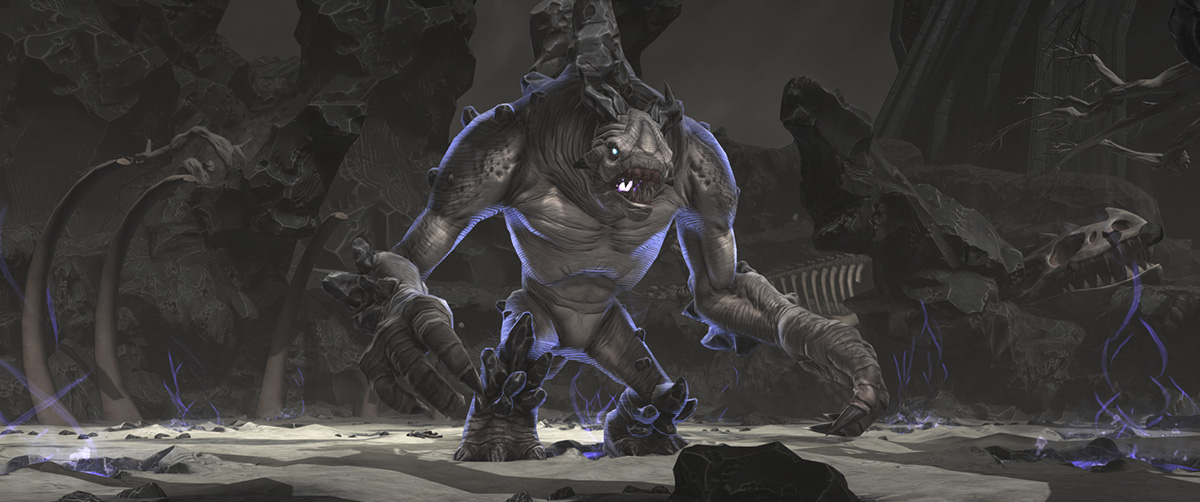
The Colossal Monolith is an instanced world boss operation on Ziost and offers two levels of difficulty (story and veteran mode) as well as options to complete the raid in 8 or 16 person format

Access to Ziost is locked behind story, so your character will have to skip to Ossus or have completed the Shadow of Revan storyline in order to access Ziost. This does not prevent players from being summoned to the operation entrance by others.

Colossal Monolith is a repetitious encounter and the speed of mechanics and sheer length of the fight trip up groups until they get a rhythm down. Speed, movement and positioning are extremely important in this encounter. Ignoring mechanics is NOT advised in any difficulty.

In veteran mode, groups must defeat Ziost’s Worldbreaker Monolith before attempting the Colossal Monolith encounter to gain the Ancient Protection buff, reducing damage taken by Colossal Monolith’s abilities.

Group Composition

Recommended: Run a standard group setup or, alternatively, run 1 tank, 5 DPS and 2 healers. There is no hard tank swap beyond tank debuff management, which a DWT can assist with.

I’m Crazy, So Why Not? Run 1 tank, 1 healer and 6 DPS. We suggest DPS be split between melee and ranged with off-heals. Staying grouped up is required for solo healing due to frequent AoE damage.

Recommended: Due to the increased damage, a 2 tank, 3-4 healer setup is recommended for standard groups. If having to choose between a second tank and fourth healer, we recommend going with a healer and having a DWT assist with Bite Wounds.

I’m Crazy, So Why Not? You can clear 16M story mode with as few as 8 people, including 2 healers, 1 tank and the rest progression-level DPS. The only issue here is simply adhering to mechanics and beating the enrage.

Recommended: A group composition of 2 tanks, 2 healers and 4 DPS is recommended for veteran mode. You’ll want a balance between ranged and melee DPS, as well as one healer who excels at AoE heals and another who can adeptly manage the spike damage. Movement abilities are a plus.

I’m Crazy, So Why Not? The only compositional change that is viable would be a shift from two tanks to 1 tank and 1 DWT. Generally, a Shadow/Assassin tank would be most adept at solo tanking this encounter with the extended shroud/resilience tactical.

Recommended: Run 2 tanks and 4 to 5 healers. DPS is less of an issue so the ability to simply stay alive while managing increased AoE and spike damage on the tanks is key. Because there are so many more people, a balance between ranged and melee, with more preference for ranged, is suggested.

I’m Crazy, So Why Not? Have exceptional healers? Run 4 and 1 tank and 1 DWT. Running fewer healers isn’t advised due to 16M veteran being less of a DPS check and more of a heal check.

Unique Rewards

Colossal Monolith has 4 achievements related to completing the encounter: 8 and 16 story, and 8 and 16 veteran. You can find the achievement under Operations > Epic Enemies.

Colossal Monolith is part of the Heart or Ruin weekly accessible on Ziost. Unlike most operation weeklies, this quest requires players to also down the Ziost world boss, Worldbreaker Monolith. It must be picked up on the planet surface of Ziost and only players who have completed or skipped past the Ziost storyline are eligible for it.

Tactics

Colossal Monolith, or the Heart of Ruin, is a long, repetitious fight. In story mode, the same five major mechanics repeat over and over. In veteran mode, some complexity is present due to how colors must be dealt with and sheer damage while the major mechanics stay the same. The primary issue with this fight is simply that high damage attacks occur very rapidly, often with spike damage on tanks and one player being followed by rapid AoE damage to the group. Strong healers and DPS that pay attention to where they are standing is essential.

Mechanics

Syphon Energy is the Colossal Monolith’s general raid attack. This frequently-occurring mechanic brackets most other activities in the fight. It’s indicated by white circles that drop underneath each player every 15 seconds. Standing in the circle is accompanied by a large hit of Force/Tech damage 4 seconds after they appear, as well as a 3 second stun.

  • All modes: Simply move out of the white circles when they drop. The damage is per circle, so if you stand in overlapping circles, the damage you take will be increased depending on how many you’re standing in. Melee can be careful about grouping behind the boss to ensure they have enough free space to move away. Else, be sure not to drop white circles by color spawn locations.
  • Fun fact: If a player dies during this phase, their white circle will immediately detonate, even if the rest of the circles have yet to explode. Bad timing has the possibility of a chain reaction of stuns and damage taken should this occur.

Lingering Destruction is a 20 second debuff that leaves a trail of 10 small orange circles that drop every 2 seconds. The circles persist for 30 seconds, deal Force/Tech damage and tick for damage every 2 seconds. A player will never get Lingering Destruction more than once every 90 seconds. The skill itself has a 30 second cooldown.

In short, it functions much like the mining droid debuff in Dread Fortress’ Grob’thok encounter in that circles should be kited away from the group and no one should stand in them.

  • Story mode: In story mode, simply have the affected player run to the edge of the room and drop all 10 circles safely away from the group. Players can basically use one skill in between a circle drop so if the boss is out of range, they can utilize self-heals, speed boosts, etc.
  • Veteran mode: Players may need to deal with other mechanics while dropping Lingering Destruction circles (color pickup). They will NEVER be targeted by the Terrible Shout conal or Curse, at the same time, however. It’s very important to bring orange circles out of the center due to the limited area where the boss can be held without receiving a damage buff by standing on a rift, and clearly away from rifts and color spawn locations.
    • If your DPS is suffering group-wide because of how circles are being handled, you may want to prioritize saving buffs to do a spike period after returning from dropping circles. You may also want to count the number of circles you drop (it’s always 10) so you can promptly return to the boss.
    • In all cases, you will run into more issues dropping orange circles in the center than you will simply taking them away from the group.
    • If a player is under the effect of Lingering Destruction and picks up a color, they will be granted immunity for the duration of the stun (up to 5 seconds, shorter if the stun is broken). No orange circles will drop though the effect will continue ticking down. This immunity is NOT granted when stunned within the grid of colors by a rift. As such, the player with Lingering Destruction will want to stand by their color but be the last to step in so o they are not standing in a stack of circles while stunned.

A major mechanic in every difficulty is the randomized conal telegraphing the boss’ Terrible Shout attack. Occurring up to every 20 seconds, this 3 second cast has an enormous area of effect that stretches easily across the width of the arena. All who are caught in the conal are left with a painful debuff that deals Force/Tech > Energy damage over 10 seconds.

The conal is not a threat drop, but the boss will look away from the tank and select a random DPS (tends not to occur on healers). This lasts for 8 seconds and the boss is taunt immune for the duration. After Terrible Shout completes, the Colossal Monolith will return to the tank.

It’s important to note that the conal is not stationary; it will follow the target. Paying close attention to the boss’ target of target is helpful to determine who is selected.

  • All modes: Have the player targeted stay still to allow other players to leave the conal. They should also use a defensive (absorb shields, Force/Tech defensives work) to mitigate the damage from the 10 second debuff. They will also need plenty of heals. You can count on players dealing with other mechanics (such as orange circles) not being targets of this attack.

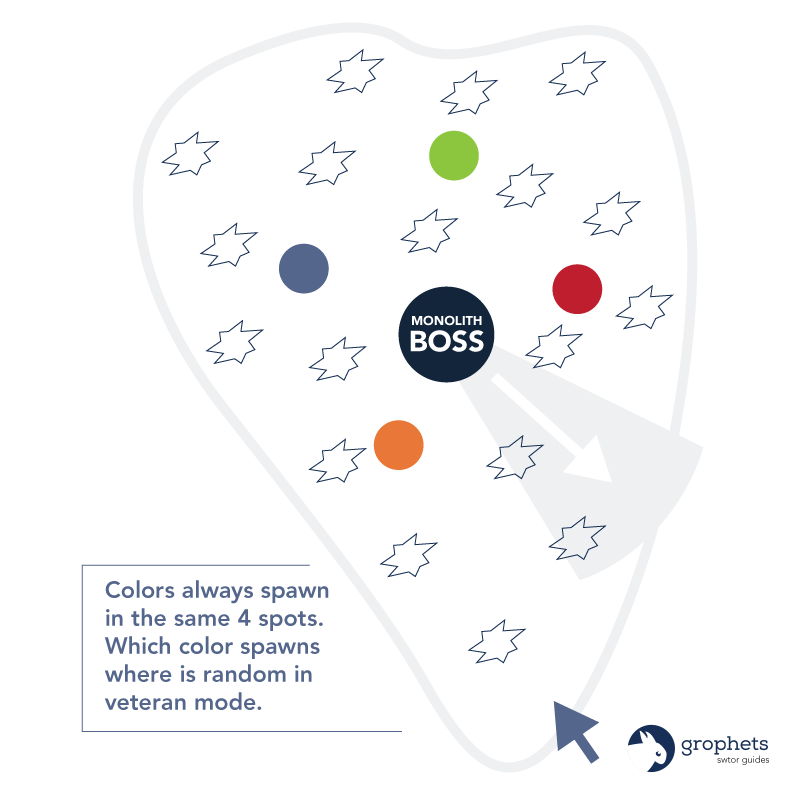
In all modes, the Monolith will occasionally “Expose the Ancient Energies of Ziost” which will cause four white circles to appear at four set locations in the arena. The goal is to haver a player “pick up” the color by walking through it and then running into the grid of four colors laid down by the Monolith during its Breaking the First channel.

How this is dealt with varies by difficulty. Each color provides a moderate buff to the player that picks it up.

Rifts, meanwhile, are stationary holes around the arena that apply a debuff to players who stand on them, and buff the boss when it stands on them. They also are central to the boss’s Breaking the Rift mechanic and are killed/consumed (filled in) when the Breaking the Rift channel is broken or completed.

  • Story mode: In story mode, only two colors are needed to break the Monolith’s channel. The same color (one of four) will appear at the same location each cycle. Keep the boss off of rifts and don’t stand on them.
  • Veteran mode: In veteran mode, the colors will randomly appear at one of the four locations. Players may not pick up the same color twice in a row. Picking up a color will clear the previous color’s debuff, which otherwise lasts for 2 minutes. Generally, a pair of players will alternate colors (typically yellow and green are paired, and then red and purple are paired) to deal with the restrictions. Players may NOT enter another color when heading in to break the Monolith’s channel. Players will also be stunned for a short time when picking up a channel, and until the Breaking the Rift channel breaks when entering their color square. Lastly, rifts also apply a healing received debuff (discussed in veteran mode changes below) in addition to the movement speed reduction.

The Colossal Monolith will use an attack called Bite Wounds, which is a 1.5 second cast, around every 18 to 20 seconds. This attack applies a debuff of the same name that reduces armor by 10% per stack, slows and reduces your damage output (at 4+ stacks), and deals Force/Tech > Internal damage. Generally tanks should attempt to have 2 or less stacks at any given time. Reapplication tends occurs about half-way through the debuff cooldown. This attack includes a knockback and the debuff lasts for 30 seconds.

  • Story mode: In story mode, tanks can either outrun the boss for a bit to drop stacks (usually best to do if you’re heading into a channel and have less than half left to go on your debuff) or tank/DWT swap.
  • Veteran mode: Due to the increased spike damage from the boss’ basic attacks, as well as the increased damage from the Bite Wounds debuff, it’s highly important swaps happen every 2 stacks.
Diagram of the Xenoanalyst encounter

Tips for dealing with…

Use the target of target interface to determine who the boss is attacking. The player in question should immediately stop moving and allow other players to move to safety.

Defensives that absorb damage, such as Shield Probe and Force Armor/Static Barrier are immensely helpful in mitigating the resulting damage.

Additionally, as this is a low priority attack, there is a chance it will be interrupted in favor of channeling over a rift.

Story Mode

Simply stand still. Players affected by Lingering Destruction (orange circles) will not be targeted by the Terrible Shout.

Veteran Mode

Players affected by either Lingering Destruction or Curse of the Monolith (leech) will not be targeted by Terrible Shout. This means that players with either leech or who are dropping orange circles should stay away from their fellow players to ensure they are not clipped by the conal.

Ensure the player with the Terrible Shout debuff receives plenty of healing. Low grade defensives also help.

Multiple players affected by this attack can, in many cases, result in a wipe.

When the Ancient Energies of Ziost are exposed (there will be a raid announcement in red text in the center of your screen), players can pick up one of four colors that appear by walking through it. Each color applies a different buff to the affected player to the player.

Generally, it doesn’t matter which class or role picks up which buff.

  • Yellow provides a healing done and healing received buff of 10%
  • Red provides a ranged and melee damage boost of 15%
  • Green provides a damage resistance buff of 10%
  • Purple provides an increased force/tech resource regeneration rate of 10%

Story Mode

Walk through a colored circle to pick up the buff, which will be indicated by an uncleansable crystal debuff. Only two are required in story mode, though all should be picked up regardless just in case players are dealing with other mechanics. You may assign players to ca specific color, or you may simply let them know where colors appear. Typically groups have an easier time if they allow free reign over color pickup – everyone should TRY to get them.

Veteran Mode

In veteran mode, all four colors must be picked up every single time. Players must also alternate colors. Divide your group members into teams of two who will swap colors after each Breaking the Rift channel, ensuring that they are not instantly killed when picking up a color. Suggested color teams are: Yellow and Green; Red and Purple OR Yellow and Purple; Red and Green.

The color leaves behind a 2 minute debuff per color; if it is not refreshed by picking up another color, the player with the debuff that expires will die. As such, limit this color pickup mechanic to the four assigned players, with backups/alternates ready if a player dies. Receiving a battle revive will not renew the crystal debuff, so the player who takes over must continue the mechanic lest they also die.

Picking up a color stuns the player in veteran mode. It is possible to be stunned while picking up a color, and then stunned again by a white circle, so be mindful about what defensives and movement immunities/stun breaks you have available going into this phase.

Generally, healers and the main tank should NOT participate in this mechanic. For additional details about why, see the information about Breaking the Rift below.

By picking up the buffs from the ancient energies (colored circles) of Ziost and running into the matching color of the Monolith’s Breaking the Rift channel (which places a grid of 4 colors over a rift) players can interrupt this mechanic and reduce overall damage taken by the group, as well as prevent a 10 second soft enrage by the boss.

Story Mode

Players must pick up a rift color and run into the corresponding color on the Monolith’s Breaking the Rift channel. You may walk through other colors to reach your chosen location. The channel will cease when 2 colors have been matched.

Veteran Mode

Tactics that advise failing this mechanic in veteran mode are categorically incorrect in 6.0 and on. Do not try to avoid this mechanic.

Picking up a color stuns the player in veteran mode. Entering the Colossal Monolith’s color grid with the correct/matching color stuns the player until the channel is broken or completed. Entering the color grid with the WRONG color kills the player.

Failing the Breaking the Rift mechanic applies a buff to the Monolith which allows it to deal a massive amount of damage for 10 seconds (it’ll be highlighted purple and generally this causes a raid wipe if healers are not prepared).

Leave this mechanic and color pickup to DPS and the off-tank. While the Colossal Monolith is channeling Breaking the Rift, continual AoE damage will go out. Plus, anyone who enters the grid of colors to help break the channel (and does so correctly, as entering a different color when your crystal doesn’t match will instantly kill you) will be stunned until the channel is broken or completes. As such, restricting a healer from keeping the group alive or preventing the main tank from setting up for the Monolith’s follow-up attacks is a bad idea unless the team has a player down.

The Bite Wounds mechanic occurs in both story and veteran mode, though the damage done is significantly increased in the higher difficulty. Because reapplication tends occurs about half-way through the debuff cooldown, you can time taunt swaps using that as a metric to reduce damage taken.

Story Mode

In story mode, tanks can either outrun the boss for a bit to drop stacks (usually best to do if you’re heading into a channel and have less than half left to go on your debuff) or tank/DWT swap. You can time taunt swaps about 50% through the debuff and then immediately grab the boss back to reduce damage on a DWT. Generally taunt swaps are easier. If you simply don’t have a DWT, it’s possible to outrun the boss on every tank class (Hydraulics/Hold the Line, Guardian Leap/Intercede and Blade Rush/Mad Dash, or Force Speed). Assassin/Shadow tanks can simply stealth out at the right time. You simply don’t want to get more than 3 stacks.

Veteran Mode

Never go above 2 stacks if at all possible in veteran mode. It’s also important to pay attention to when the swaps are occurring. If two-tanking, you have more leeway and can swap whenever makes sense. If solo-tanking the fight, you should do it near the 50% mark of the Bite Wounds debuff cooldown and immediately taunt back when the DWT takes the debuff. The DWT should be using a Force/Tech defensive to mitigate the damage from the Bite Wounds attack and some of the ticking damage of the debuff. Note that the DWT will need continued healing. You’ll also want to take into account boss positioning as this is accompanied by a knockback. Never put yourself in a position where you will be standing on a rift after the knockback (reduced healing and a slow) or where the boss will be standing on a rift.

Heals that are tagged as AOEs do not cause Curse to tick for damage, provided the player that is Cursed is not the primary target of that heal. See below for safe options for using AOE and “smart” heals during Curse periods.

  • Safe to CAST BEFORE and AFTER as long as cursed player is not the primary target of the heal
    • Successive Treatment / Progressive Scan (Commando/Mercenary healer) – checks for AoE heal immunity tag for each tick, no HoT
    • Kolto Waves (Scoundrel/Operative healer) – checks for AoE heal immunity tag for each tick, no HoT
    • Wandering / Roaming Mend (Sage/Sorcerer healer) – checks for AoE heal immunity tag for each tick, no HoT
    • Healing Volts Tactical (Sage/Sorcerer) – checks for AoE heal immunity tag for each tick, no HoT
    • Undying Protector Set Bonus (Sage/Sorcerer)
    • Force Suffusion Utility (Overload/Force Wave)
    • Jet Rebounder Utility (Commando/Mercenary)
  • Safe to CAST AFTER as HoT can’t be actively ticking when Curse is applied, but can be used safely after
    • Kolto Cloud / Kolto Missile (with resulting Kolto Pods HoT) (Commando/Mercenary heals) – cast after because the HoT will continue healing once applied
    • Salvation / Revivification (Sage/Sorcerer heals) – cast after because the HoT will continue healing once applied
    • Sonic Heal Tactical (Sonic Round / Sonic Missile) (Vanguard/Powertech) – cast after because the HoT will continue healing once applied
    • Shadow’s Shelter / Assassin’s Shelter Utility (Shadow/Assassin) – cast after because the HoT will continue healing once applied
  • NEVER USE around Curse periods
    • Bloodthirst raid buff (Sentinel/Marauder)
    • Orbital Heal Tactical (Gunslinger/Sniper)
    • Healing Haze Set Bonus (Scoundrel/Operative)
    • Unlimited Power raid buff (Sage/Sorcerer)

Veteran Mode Changes

Beyond having more health and dealing far more damage, veteran mode introduced 3 new mechanics to Colossal Monolith: a leech debuff, a mandated color swap, and the rifts now reduce healing taken.

New Mechanics

  • Curse of the Monolith (Leech): Every 60 seconds, starting after the first Terrible Shout, one player will be Cursed with a 10 second debuff that reduces healing taken and deals damage any time the player is healed. Absorb shields, reflects, and standing on a Rift helps manage this mechanic. The damage dealt is Force/Tech. The Cursed player will also want to stay at least 10 meters away from the boss lest they heal the Monolith. Players with Lingering Destruction will never be cursed. Exiting combat (such as a stealth pre-7.0) removes this debuff.
    • Expect Curse after the first Terrible Shout (soon after initial pull) and after every Rift is completed.
    • Heals that are tagged as AOEs do not cause Curse to tick for damage, provided the player that is Cursed is not the primary target of that heal. See below for safe options for using AOE and “smart” heals during Curse periods. See above for in the Tips for Dealing With section under “Healing During Curse of the Monolith” for a list of safe and unsafe heals.
    • Players that are outside of 10 meters will tend to be selected first. This means a ranged player will tend to get the first Curse, while people dealing with Rift breaking/colors will tend to get the remaining. If everyone is within or outside of 10 meters, the selection is random.
    • Curse is not restricted to a specific role. Tanks, healers and DPS may get it.
  • Rift Heal Reduction: Standing on a rift applies a 50% healing received reduction (in addition to the normal 90% movement speed reduction). Combined with the 50% healing received reduction from Curse of the Monolith, standing on one can completely negate ticking damage from receiving heals while under the effect of Curse.

Changes to Existing Mechanics

  • Breaking the Rift: Players may NOT enter any other color than the color that matches their buff. If a player who picked up the red color circle enters the green square, they will be instantly killed and that color lost, and so on.
  • Color Swapping: While 4 different colors still spawn in veteran mode, players can never pick up the same color twice in a row; instead, they must pick up a different color lest they be instantly killed. As such, most groups organize “teams” that alternate between a set of two colors. Unlike in story mode, color spawn locations – while still in one of four set locations – are randomized as far as which color appears in which of those four spots.

8 Person Veteran

DPS and heals are the primary issues that teams run into on 8 person veteran mode. Running 1 tank and 1 DWT can help mitigate this by making the fight significantly shorter. It leans heavily on skilled and responsive healers, but can help reduce the failure rate by simply reducing the length of the fight. A main tank that is a shadow/assassin or guardian/juggernaut is suggested due to the required defensive rotations.

16 Person Veteran

In 16 person veteran mode, DPS is less of an issue than simply keeping all players alive. Run 4-5 healers and 2 tanks. The fight shouldn’t approach the enrage timer in the least.

Role Tips

What you should know if you’re playing a Tank, DPS or Healer in this fight.

  • If solo-tanking, ensure your DWT knows when to taunt. This is entirely dependent upon your Bite Wounds stacks. Have the DWT taunt half-way through the debuff timer and it should reduce the damage they need to deal with and how long they need to hold the boss.
  • Positioning matters. Holding the boss on a rift, or standing on a rift yourself, introduces a myriad of issues, not the least of which being you’re slowed and the boss is buffed.
  • Most damage in this fight is force/tech. Abilities and defensives that decrease this type of damage (or negate it, in the case of Resilience/Shroud), can be very useful. Take tacticals and gear that increases the duration of your defensives.
  • Yes, tanks can get curse of the monolith in veteran mode. It is much more unlikely to happen if you stay within melee range of the boss.
  • Utilize movement skills (utilities that increase the length of these skills helps) on the regular. You’ll need them to get out of white circles, as well as to reach the boss during its Breaking the Rift channel.
  • Take orange circles to the edge of the room. Under no circumstances should you let them pile up in the center unless you want to make your team’s life harder. The Lingering Destruction debuff is orange – watch for it. You’ll drop 10 circles total.
  • If you are targeted by Terrible Shout (target of target is helpful), DO NOT MOVE. Allow your teammates to get out of the conal. Additionally, using defensives to deal with the debuff and DoT left over helps healers.
  • In veteran mode, stand on a rift if you are targeted by Curse of the Monolith. It ensures you won’t take any damage from heals. The debuff is purple and lasts 10 seconds.
  • Be proactive about picking up colors. They always spawn in set locations (though in veteran mode which color spawns in which of the 4 locations varies). Being slow with this mechanic generally makes this fight a lot worse.
  • Have a backup plan if someone assigned to a color dies. Another DPS or a tank should take on color pickup if one of the players picking up colors dies and cannot be revived before the next round.
  • Keep an eye on where players are standing. Being aware allows you to predict their movement, instruct players with Lingering Destruction to get out of the group, and keep an eye on what obstacles your teammates will be running into.
  • Ensure you can see uncleansable debuffs. You don’t need to cleanse anything in this fight, but most mechanics leave a debuff. Being able to see that is useful.
  • Several attacks leave some sort of DoT. Be prepared to heal affected players for 10 or more seconds.
  • Prepare for AoE damage during Breaking the Rift channels. Else, you’ll largely be dealing with spike damage on the tank (Bite Wounds and basic attacks) and on any players targeted by Terrible Shout.
  • In veteran mode, be prepared to stop healing on any players affected by Curse of the Monolith. Much like Kel’sara’s Leech in the Terror from Beyond Dreadguards encounter, this mechanic damages the player any time they are healed.

Damage Profile

  • Skill Name: Bite Wounds (Tank Debuff)
  • Damage Type: Force/Tech
  • Frequency: Up to every 18 seconds
  • Damage Spread: Single target attack on the player holding the boss. Bite Wounds leaves a 30 second debuff behind that reduces armor rating by 10% per stack (up to 6 stacks) and deals Force/Tech > Internal damage every 2 seconds.
  • How to Defend: Tank swap every 2-3 swaps to allow the debuff to fall off and reduce overall damage taken.

  • Skill Name: Terrible Shout (Conal)
  • Damage Type: Force/Tech > Energy
  • Frequency: Up to every 10 seconds
  • Damage Spread: This attack will deal damage to anyone within its conal area of effect. It is indicated by a white triangle in front of the boss.
  • How to Defend: If you are not the target, step out of the conal. If you are the target, stay still, and then use an absorb shield or Force/Tech defensive to mitigate the damage that occurs over the course of the 10 second debuff.

  • Skill Name: Syphon Energy (White Circles)
  • Damage Type: Force/Tech > Internal
  • Frequency: Up to every 15 seconds.
  • Damage Spread: A white circle drops under every player and persists for 4 seconds before exploding, dealing AoE damage, and applying a 3 second stun to any players in the affected area.
  • How to Defend: Step out of the circle, ensure smart grouping of the circles with regards to melee, and stay away from color spawn locations. If you are caught, use a stun break, else you can use a reflect or Force/Tech defensive to mitigate damage. Speed boosts also help if you’re having lag issues or are in a large group of white circles.

  • Skill Name: Lingering Destruction (Orange Circles)
  • Damage Type: Force/Tech > Elemental
  • Frequency: Up to every 30 seconds, with a duration of 20 seconds once applied. Players will never receive it more than every 90 seconds.
  • Damage Spread: Players drop a trail of 10 small orange circles over the course of the debuff, one every 2 seconds.
  • How to Defend: Move to the edge of the room and drop the circles. Step out of them. They last for 30 seconds.

Additional Resources

Find More Ops Guides At

Authored by Erani
Authored by Erani

Hi, I’m Erani. I’m just a random gamer with an out of control fiery grophet collection. With the help of some amazing friends, I seek to make SWTOR content more accessible. Here’s to gamers of all shapes, sizes and creeds kicking butt.

Help, input and feedback was provided by:

  • Khazad Sanci

Leave a Reply

Your email address will not be published. Required fields are marked *

This site uses Akismet to reduce spam. Learn how your comment data is processed.