Sparky in Ravagers operation

Sparky

About

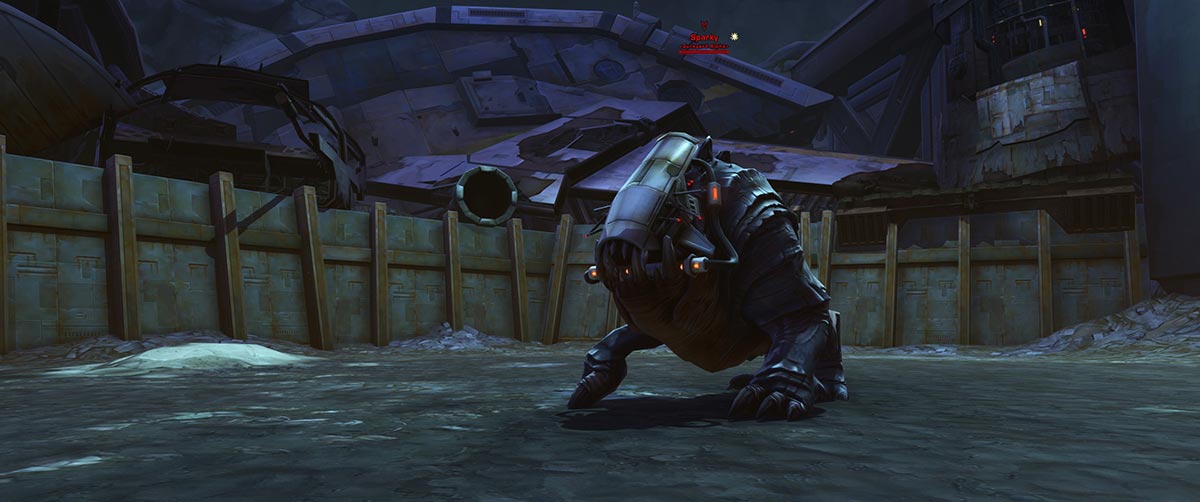
As the first boss in Ravagers, Sparky <The Junkyard Dog> features add management and movement/positioning mechanics. This encounter is available in both story and veteran mode, and between difficulties, is the easiest boss in this operation. 

In most cases, a tank swap is not required regardless of difficulty. If running two tanks, each will have a dedicated job. DPS and healers have it relatively easy and will alternate between focusing adds as needed and then damaging the boss. In veteran mode, both tanks will need significantly more healing as the fight progresses, particularly if add groups are not killed and/or if tank debuffs are not managed such that overall damage taken is reduced.

There are no adds to clear leading up to Sparky. Make sure that when pulling, no one is standing in the opening to the arena as a crane will drop a large piece of metal to seal off the encounter area. Anyone in the opening will be instantly killed.

Group Composition

Recommended: Run the standard group setup with 2 tanks and 2 healers.

I’m Crazy, So Why Not? Run 1 tank and 1 healer. Damage is moderate to negligible in story mode so this encounter is easily solo-healable. Additionally, since adds are not buffed by boss proximity, as long as they are killed quickly, the tank should have no issue holding the boss alone.

Recommended: Run 2 tanks and 3-4 healers.

I’m Crazy, So Why Not? Run 1 tank and 2 healers, for the same reasons as reduced support roles work in 8 man. Additionally, a solid group can complete this encounter with only 8 players.

Recommended: Run 2 tanks, 2 healers and 4 DPS. All fights in Veteran mode either require separate mechanics or tank swaps, and thus solo-tanking a fight entirely is impossible and/or inadvisable. Sparky is no exception. Additionally, the new difficulty level means solo-healing is more difficult unless the group is exceptionally skilled at avoiding damage and using defensives. The DPS check is not so difficult to call for extra damage.

I’m Crazy, So Why Not? You can attempt to run 1 healer if the group is skilled and experienced on Sparky.

Recommended: Run 2 tanks and 3-4 healers.

I’m Crazy, So Why Not? To blast through the fight, you can have one or two of the healers swap to DPS for the first encounter. Continue to use 2 tanks.

Unique Rewards

Sparky has 4 achievements related to completing the encounter: 8 and 16 story, and 8 and 16 veteran. You can find the achievement under Operations > Ravagers.

A weekly quest called [WEEKLY] The Ravagers is available at any operations terminal. This operation is also accessible for groups of 8 in story mode through group finder. Additionally, a one-time quest is available – per character – outside of the operation door. A sleen mount is the reward.

Pirate and cantina-themed decorations have a small chance to drop from the boss and any adds in the operation.

This operation has a small chance to drop a unique mount in both veteran and story mode upon completion. This boss has no unique drops.

Tactics

The majority of Sparky’s mechanics affect tank positioning, while DPS will need to deal with moderate damage only during select parts of the fight.

  • Whenever the boss is shielded, DPS her to break the shield and stun her for a bit.
  • In veteran mode, keep adds away from the boss.
  • The tank on Sparky will have to deal with a knockback and shoulder toss. Spin the boss as needed just before shoulder toss to avoid excessive movement.
  • Sparky’s basic attacks are cleaves, don’t stand with the tank.
  • One tank should not be holding both the boss and adds for extended periods.

The encounter opens with Sparky being shielded until below 90% health. When active, Sparky’s shield collar reduces her damage taken by 50%. During select portions of the fight (at the start and during Brutalize), it will actually apply an absorption shield that acts as a DPS check. In order to progress in the fight, DPS must break the shield by attacking it. This means don’t just use basic attacks!

Once the shield is broken, Sparky will be knocked down and stunned for 5 seconds due to being “Injured.” This period is also typically marked by adds that are attacking the main tank finding other targets, unless otherwise taunted.

  • Veteran mode: If the DPS check to break the shield collar at the start of the fight is not met, the group is likely to have continued issues through the entire operation. Save raid buffs, but don’t be afraid to go all out otherwise. The quicker the shield is broken, the quicker Sparky starts taking 100% damage.

Sparky’s Body Slam is a frontal cleave that includes a knockback. It is best handled with the tank against a wall.

Shoulder throw tosses the tank over her shoulder, turning the boss around. You can pre-empt it by moving yourself so you’re knocked back into the wall, but otherwise just be prepared to run back to your safe spot whenever you’re pushed around. It always occurs after Body Slam and there tends to be a 10-12 seconds gap in between each skill execution. 

Class alternatives for handling Shoulder Throw include: Vanguard/Powertech tanks can use hydraulics before every Shoulder Throw to eliminate the physics effect. If you hit it prior to the cast, you have a higher likelihood to have hydraulics up for every Throw. Finally, Shadow/Assassin tanks can stealth out just as the Shoulder Throw cast finishes and re-taunt the boss to eliminate the chance of moving.

Otherwise Sparky’s basic attacks are all weapon damage, her roars are force/tech AoE attacks, and she has several pounces that the group will experience at large.

  • Story mode: Do your best to keep Sparky immobilized. If you are not confident in turning the boss on time, try to keep Sparky in a corner so when you are tossed you don’t take the boss with you across the room. This is more for the convenience of your melee DPS than anything else.

Veteran mode: In veteran mode, it is doubly important to keep the boss immobile due to how she buffs any adds within her circle of influence, as well as forces them to attack her own target. Second, an added mechanic to this situation is a debuff called Delicious that is applied any time she knocks the tank back or tosses them over her shoulder. Delicious increases damage taken by 20% per stack, and dropping those stacks during Rampage and other scripted mechanics becomes an important task to mitigate damage taken.

Spread out when Sparky starts her Rampage. She’ll jump from raid member to raid member, with each target visible by the red circle under their feet. The circle will follow you so DO NOT MOVE to allow people who aren’t targeted to move out (or vice versa, but generally it’s nicer if the target stays still). You’ll become a cushion for her landing, and it serves as a knockdown and interrupt, but the damage of the impact is easy to heal through. You can track the duration of Rampage by watching the new Rampage buff on her bar count down.

When Sparky reaches 60% or below, Rampage will be followed by new attacks called Brutal Pounce and Brutalize. A raid member will be pinned and Sparky will start channeling for 20 seconds. Attack her to interrupt it (done by overloading the shield collar), else her target will be one-shot when the channel completes. The DPS check during this phase is a flat 157,469 damage total. Brutalize will still occur even if Sparky enters Rampage above 60% health as long as she’s pushed below that before Rampage completes.Veteran mode: The tank holding Sparky should avoid taunting during this phase particularly if they have stacks of Delicious; it’s usually just about the time in which they will expire, so let that happen. Simply allow the attack to go out on a DPS, and be in position to take the boss back once the channel is broken. That does not mean the main tank won’t be the target, however; merely to avoid increasing the odds.

Adds in this encounter appear whenever Sparky uses Roar, Forceful Roar, or Desperate Roar, which are frontal AoEs that have a half-second cast. These skills are all on different cooldowns, and will be used at different portions of the fight.

Roar will be used at the start of the encounter on a 17 second cooldown. Forceful Roar will be used during the middle of the encounter on a 40 second cooldown when the boss reaches around 80% health or below. Desperate Roar summons 1 add and will start being used at 25% health and below on a far quicker cooldown. Any guides that suggest there is a set timer for add spawns is incorrect – it is purely based on skill execution, invisible stacking buffs, and Sparky’s health. The exact timing will vary due to your group’s DPS.

A loose overview of what to expect related to add spawns (exact percents may vary):

  • Phase 1 (100 – 90% health): 1 add per roar every 17 seconds.
  • Phase 2 (90 – 50% health): 2 adds per roar every 40 seconds (though you’ll often see the first set of two adds around 85-80% health due to Rampage being a higher priority ability).
  • Phase 2.5 (50 – 25% health): 3 adds per roar every 40 seconds.
  • Burn (25% – below): 1 add per roar every 5 seconds.

When the boss reaches the soft enrage point of 25% and her collar is permanently broken, adds will spawn far more often because Sparky will be using Desperate Roar, which has a 5 second cooldown though it just summons 1 add at a time.

Adds primarily deal melee ranged weapon damage, with their most dangerous mechanic including the application of a stacking debuff called Rending Swipe that increases damage taken. The percent increase depends on difficulty.

  • Story mode: The Rending Swipe debuff falls off within 10 seconds in story mode and increases damage taken by 2% per stack. Gather up any adds and bring them to the boss. Yes, that means any adds on a ranged player too. DPS from fellow raid members is the best defensive. A dead mob is one that’s not doing damage.
  • Veteran mode: The Rending Swipe debuff is permanent, increases damage taken by 4% in veteran, and once you gain a stack, it will not drop until the fight is completed. As such, it is important to avoid tank swaps if one tank has an excess of Rending Swipe stacks unless absolutely required. And if it is required, the tank holding Sparky should not go pick up adds because a taunt swap would only occur to mitigate stacks of Delicious; simply taunt the boss back with Delicious stacks drop off and do the utmost to avoid also gaining stacks of Rending Swipe. The combination of the two debuffs (one permanent, the other that falls off) is likely to result in a large amount of extra damage taken if on the main tank. 

On top of that, Sparky buffs any adds that enter her circle of influence (15 meters) in veteran mode (Command Presence), as well as forces them to attack her current target (Commanded). Thus, the tank holding adds will want to keep them on the other side of the arena, grouped up for ease for any DPS that can assist during downtime, and single-taunt any adds that are otherwise not grouped up.

  • Fun fact: There are 16 different adds and their names are: The Boss, North, Dinner, Tank, Little Pirate, Voguz, Precious, Deshy, Nerf, Grappa, Scrap, Jwizzix’Xthor, Mu Na Ya, Duke, Spike, Tenebro. They tend to spawn in that order, and repeat if their counterpart from an earlier wave was defeated.

When the boss reaches 25% health, Sparky’s shield collar will break entirely. In all modes, her ability to buff surrounding adds will cease and the group should use raid buffs at that time and burn her down to zero. The tank holding the boss will want to stay as stationary as possible to assist with maximum burn. Unless absolutely needed, DPS should focus on the boss alone.

During this phase, Sparky will also soft enrage. She will summon adds even faster, so it becomes progressively more difficult as time goes on to control the add spawns and group damage.

The tank holding adds has two options: bring them to the boss to benefit from splash damage, or hold them for the duration of burn. As soon as the boss dies, the tank with adds will want to use a strong defensive that works against weapon and melee damage (Saber Ward, Deflection, Energy Shield) as adds will soft enrage and pounce on their target. Alternatively, if that tank has high stacks, the other tank can AoE taunt them and use a defensive instead.

Kill all remaining adds to complete the encounter.

Tips for dealing with…

Both Shoulder Throw and Body Slam are on 24 second cooldowns. Body Slam always comes first, followed by Shoulder Throw and, depending on the progress of the fight and internal skill cooldowns for Sparky, Body Slam may or may not occur again as the boss heads into Rampage. As such you should be dealing with a pattern of Body Slam > Shoulder Throw in repeated blocks and that repeats each time Rampage and Brutalize complete, so the first attack will be a Body Slam again followed by Shoulder Throw.

Shoulder Throw tosses the tank over the boss’s shoulder. So after Body Slam, the tank can wait 6-10 seconds, turn the boss 180 degrees, and then take the Shoulder Throw (they tend to occur about 12 seconds apart though this is not the rule). Turning the boss does turn the cleave onto the group, but let your group know so your DPS can shift with you.

An alternative for Shadow/Assassin tanks is to run the double cloak tactical, and stealth out and re-taunt the boss at the end of the Shoulder Throw cast. Vanguard/Powertech tanks can use hydraulics to avoid the physics effect.

Restricted to veteran mode, Delicious is a stacking debuff applied to the tank holding Sparky every time Body Slam and Shoulder Throw are used. Each stack causes the target to take 20% increased damage. It stacks up to 10 times and lasts 30 seconds. Tanks typically want to stay at 2-3 stacks and below.

Strategies to deal with dropping stacks include a taunt swap or simply staying away from the boss for as long as possible during her Rampage to avoid a refresh.

Based on the progress of the fight, a tank can usually drop stacks during Rampage (they will be around 2-3 stacks at that point). If something goes wrong and they do not fall off, a taunt swap would be needed. Do note that Delicious also stacks with the damage increase buff applied by the adds – so avoid swaps with the off tank if they have high stacks of Rending Swipe.

In veteran mode, Sparky will have a faint red circle around her with a 30 meter diameter (or 15 meter radius). Any adds that enter that radius will be buffed by her Command Presence Aura as well as be compelled to attack her current target. They can be taunted away.

When they spawn, adds (unless within her Command Presence range) will attack their nearest target. Tanks in veteran mode will always want to taunt the adds attacking the main tank first, followed by any adds on melee DPS and finally any on ranged DPS and/or healers.

Whenever an add is taunted, they do an attack called Rage Pounce, which is a 2 second cast and will force them to leap and deal significant damage to the person who taunted them. It also includes a short 1 second stun. As soon as Sparky is defeated, the tank on adds should use a defensive when AoE taunting if a large number of adds are still alive.

Veteran Mode Changes

New Mechanics and Attacks

In veteran mode, Sparky has a faint red circle around her that extends 15 meters out on all sides. This affects several new mechanics, including: 

  • Safety of the Pack: Any adds within that circle benefit from a 50% damage taken buff that only falls off once they exit the circle or once you enter burn phase and the circle disappears.
  • Command Presence: Sparky directs adds within her circle of influence to attack her target. As such, any adds within her circle will be forcibly aggroed to Sparky’s target and can only be taunted off.
  • Delicious: A debuff that increases damage taken by 20% per stack. Applied to the main tank upon a Body Slam and/or Shoulder Throw.
  • Rending Swipe: Stacks from the adds no longer fall off and increase damage taken by 4%, up from 2% in story mode.

8 and 16 Person Changes

No major changes exist between 8 and 16 person veteran mode except Sparky’s health, which is just over double its 8 person total.

Role Tips

What you should know if you’re playing a Tank, DPS or Healer in this fight.

  • Each tank has a specific job: hold the boss or manage adds. Neither is better than the other, but both tanks are entirely dependent upon their co-tanks actions when it comes to reducing overall damage taken.
  • In story mode, adds can be stacked on the boss. In veteran mode, they should be kept away from the boss under all circumstances.
  • Taunting an add enables an ability called Rage Pounce, which deals moderate damage and includes a leap/gap closer and 1 second stun. With a few adds, this is easy to deal with. With 5 or more after the boss is defeated, be careful AoE taunting without a defensive.
  • Body Slam includes a knockback and short stun. It will be followed 10-12 seconds after by Shoulder throw, which tosses the tank over Sparky’s shoulder across the room. Spin the boss around before Shoulder Throw to keep her in place so you’re thrown into the wall. Be aware that you will turn her basic attacks, which are cleaves, onto the group. The Body Slam > Shoulder Throw pattern restarts every time Sparky uses Rampage.
  • Sparky is taunt immune during Rampage, but can be taunted before Brutalize to force the attack to go to the tank. Not recommended in Veteran mode if the tank has stacks of Delicious.
  • Sparky will continue to do Shoulder Throw and Body Slam through burn, which starts at 25%. Because those abilities are not delayed by Rampage, stacks of Delicious will accumulate faster and faster.
  • Most of Sparky’s notable attacks are direct weapon or kinetic damage.
  • In story mode, bring adds to the boss to benefit from AoE and DoT spread.
  • In veteran mode, and if ranged, stay out of Sparky’s circle of influence so any adds that spawn have a chance to latch onto you; they attack the person closest to them when they land and it’s easier for the tank managing adds to peel them off a ranged DPS than it is off the main tank.
  • Help AoE adds down occasionally during the encounter, at least until you start burn phase.
  • Burn starts at 25% and you should focus entirely on getting the boss down to 0% from that point on. Use raid buffs and all offensive cooldowns.
  • Outside of Rampage, the group takes negligible damage during this encounter. Tanks will take the most, particularly the tank holding Sparky.
  • If you have downtime, you can assist with damaging the boss or the adds.
  • Be prepared to spike heal anyone who is targeted by Brutalize, and keep the tanks alive during burn phase.

Damage Profile

  • Skill Name: Great Swipe
  • Damage Type: Weapon
  • Frequency: No cooldown, no cast time
  • Damage Spread: Frontal cleave
  • How to Defend: Don’t stand with the tank.

  • Skill Name: Roar, Forceful Roar and Desperate Roar.
  • Damage Type: Force/Tech > Internal
  • Frequency: Up to every 17 seconds with a 0.5 second cast.
  • Damage Spread: Very weak frontal AoE attack that acts as one of the calls for add spawns.
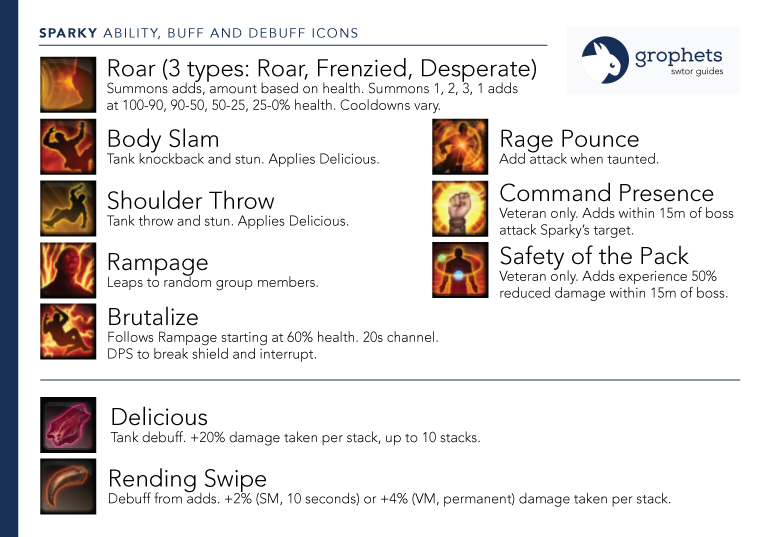
  • How to Defend: Damage is minimal, no need to defend against it. Roar summons 1 add through 90% health. Forceful Roar summons two and then three adds as Sparky’s health drops. Desperate Roar summons 1 add every 5 seconds during burn phase.

  • Skill Name: Rampage!
  • Damage Type: Force/Tech Kinetic
  • Frequency: Rampage can occur up to every 48 seconds. It is preceded by a 3 second cast and lasts for 12 seconds. If Sparky is above 60% health, it will not be followed by a Brutalize. If Sparky is at or below 60%, Rampage will include a Brutalize attack at the end.
  • Damage Spread: Sparky jumps to 6 random raid members, one every 2 seconds, and anyone within the red circle will be knocked down and take damage. The resulting stun lasts 3 seconds.
  • How to Defend: Don’t stand in the red circle. You will never be pounced on twice due to an invisible 60 second buff.

  • Skill Name: Delicious
  • Damage Type: Debuff – damage taken increase
  • Frequency: Lasts 30 seconds, is applied each time boss casts X. This debuff stacks up to 10 times.
  • Damage Spread: Goes on the main tank and increases damage taken by 20% per stack.
  • How to Defend: Utilize a tank swap, or intelligent positioning to drop stacks. Generally tanks shouldn’t go above 4-5 stacks.

  • Skill Name: Brutal Pounce and Brutalize
  • Damage Type: Force Tech > Kinetic (Pounce) and Internal (Brutalize)
  • Frequency: Occurs after Rampage completes once the boss reaches 60% health or below. The Brutalize channel lasts 20 seconds.
  • Damage Spread: A single player will be attacked, stunned, and immobilized for the duration of the channel.
  • How to Defend: DPS into Sparky’s shield to break her channel. If the shield is not broken and the boss interrupted as a result, Sparky’s target will take a massive hit of Force/Tech damage as an instant kill.

  • Skill Name: Body Slam
  • Damage Type: Force/Tech > Kinetic (AOE)
  • Frequency: Up to every 24 seconds with a 1 second cast
  • Damage Spread: Damage is applied to Sparky’s current target and anyone standing on them. It requires melee range and includes a 1.5 second stun.
  • How to Defend: This is dealt with by the tank, and is a knockback and short stun. It is shortly followed by a shoulder throw. Ensure your back is to a wall to reduce how far the boss moves.

  • Skill Name: Shoulder Throw
  • Damage Type: Force/Tech > Internal
  • Frequency: Up to every 24 seconds with a 1 second cast
  • Damage Spread: Damage is only applied to Sparky’s current target and requires melee range.
  • How to Defend: This attack primarily causes positioning issues as it picks up the tank and throws them over Sparky’s shoulder. The tank can turn the boss around 180 degrees prior to the attack and negate any issues by getting tossed into the wall instead. This attack is preceded by Body Slam.

Additional Resources

Find More Ops Guides At

Authored by Erani
Authored by Erani

Hi, I’m Erani. I’m just a random gamer with an out of control fiery grophet collection. With the help of some amazing friends, I seek to make SWTOR content more accessible. Here’s to gamers of all shapes, sizes and creeds kicking butt.

Help, input and feedback was provided by:

  • Khazad Sanci

Leave a Reply

Your email address will not be published. Required fields are marked *

This site uses Akismet to reduce spam. Learn how your comment data is processed.