Navigate
About
Gharj is the second boss encounter in SWTOR’s Eternity Vault operation. This fight is largely a heal check due to frequent area of effect damage applied to anyone within melee range of Gharj during his leaps.
Additionally, players can expect to move around the arena, using rock paths and islands to avoid the lava (which deals ticking damage if you step into it). When it comes to standing in safety, just remember if the ground is shaking beneath you, move.
There are rare cases in which the islands fail to drop, which typically arises from damaging the boss quicker than the encounter is balanced for. While the rock path to the next platform appears, the island the boss and group are currently on fails to shake. If this occurs, do not follow the rock path to the next island, as the newly spawned island will disappear instead.
Tactics
This encounter can be dealt with easily by addressing individual mechanics as they occur. Note that the only differences between veteran and story mode, as well as 8 and 16 person, is damage dealt by any given attack. No extra mechanics are introduced.
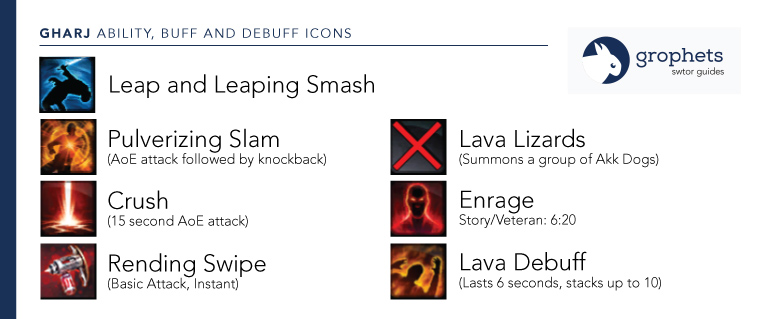
Mechanic 1: Leaping Smash
Welcome to the joy of being a tank or melee DPS player on Gharj: you will be hit with frequent point blank AoE attacks (15 meter radius) as the boss jumps up and down. The leaping smash deals AoE force/tech damage and has a 4 second cooldown, though it occurs less frequently than that. Utilize absorb shields, soft defensives and force/tech defensives that work against AoEs to hel0p mitigate damage. Never stand directly under the boss nor should you stand with the tank. Additionally, as soon as it’s time to move platforms, do so to avoid taking additional slams.
Mechanic 2: Platforms
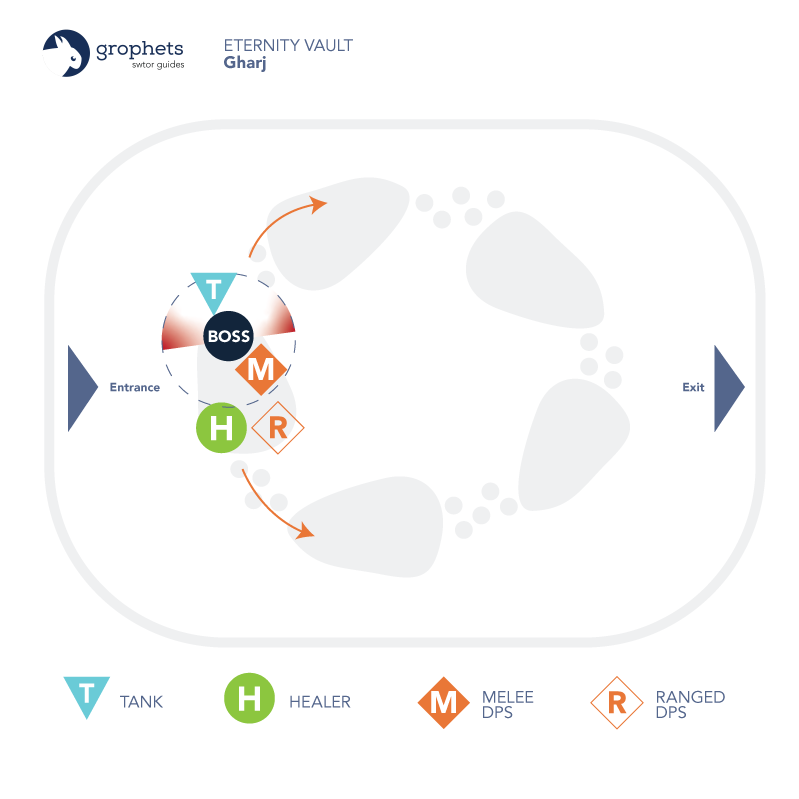
The arena has a series of 5 oblong platforms in a circle, which are large pieces of rock that fall from the ceiling and float in the lava for a short time. One platform will be active at a time, unless in transition phase, which allows for two platforms to be up that are connected by a short path of rocks floating in the lava. The goal is to move from platform to platform before the older one and the path are melted.
Platform transitions when the boss reaches 95, 70, 50 30 and 10% health. The visual indicator that a platform is about to drop is that it starts shaking.
Typically the tank and melee DPS stand at one of the platforms while ranged DPS and healers stand at the other.
Mechanic 3: Knockback
This attack has three parts. First, the boss does a 1 second cast for Pulverizing Slam which deals weapon damage on Gharj’s primary target. Then, AoE damage is dealt to anyone within melee range. Those individuals are tagged with an invisible debuff that makes them immune to the next part of this attack: the knockback. Finally, if a player is standing at range (with a 40 meter limit) after the AoE went out and didn’t take damage from it, they will get knocked back. Nine times out of ten this means ranged DPS and healers are flung off the current platform.
The end goal for anyone knocked back is to return to the platform and take as little damage from the lava as possible.
Mechanic 4: Lava
Don’t stand in the Kool-Aid. It hurts. Standing in lava for any length of time applies a fire debuff that lasts for 6 seconds and stacks up to 10, one stack per second. The debuff deals elemental damage.
Mechanic 5: Adds
Lava Lizards, which are a form of Akk Dog, spawn just before platform transitions (or every 30 seconds, whichever comes first), once the boss is at or below 51% health. As standard adds, you can either group them up and AoE them down on the platform (should it not be about to drop), or bring them with the group to the newer platform and kill them there. Avoid standing in stupid just to fluff your DPS. If it’s time to move platforms, then move.
Role Tips
What you should know if you’re playing a Tank, DPS or Healer in this fight.
Damage Profile
- Skill Name: Leap
- Damage Type: Force/Tech > Kinetic
- Frequency: Whenever Gharj’s primary target gets out of range, Gharj will leap, within a 30
- Damage Spread: This impact of Gharj landing is an AoE attack and includes a 2 second stun. A stun break can be used.
- How to Defend: If not the main tank, avoid standing with the tank when moving from platform to platform until Gharj gets resituated.
- Skill Name: Leaping Smash
- Damage Type: Force/Tech > Kinetic
- Frequency: Up to every 4 seconds
- Damage Spread: This is a point blank AoE attack centered on Gharj with a radius of 15 meters. This affects everyone within melee range (and then some) and deals moderate damage.
- How to Defend: If you are a melee DPS, take AoE damage reduction abilities, rotate through defensives and avoid stepping in front of the boss. If ranged DPS or a healer, stand outside the 15 meter attack radius. Melee DPS should group closely to take advantage of AoE healing.
- Skill Name: Rending Swipe
- Damage Type: Weapon Damage
- Frequency: This attack has no cooldown and functions as Gharj’s basic attack.
- Damage Spread: This is a frontal AoE conal.
- How to Defend: Don’t stack with the tank.
- Skill Name: Pulverizing Slam
- Damage Type: Weapon Damage
- Frequency: Up to every 24 seconds
- Damage Spread: Following the 1 second cast for Pulverizing Slam which deals weapon damage on Gharj’s primary target, AoE damage is dealt to anyone within melee range. If a player is standing at range (with a 40 meter limit) and did not get hit by the initial AoE attack, they will get knocked back.
- How to Defend: Utilize teleports, gap closers and speed boosts to return to the platform after being knocked back. Always ensure that your back is not to a lava fall (a vertical spill of lava from the ceiling), as being knocked into one is an instant death. For melee DPS and the tank, use AoE damage reduction and defensives as usual.
- Skill Name: Crush
- Damage Type: Force/Tech > Kinetic
- Frequency: Up to every 15 seconds
- Damage Spread: Damages players within 15 meters of Gharj, typically melee DPS and tanks.
- How to Defend: Utilize rotational defensives and if a ranged DPS or healer, stay out of the group on the other side of the platform. Otherwise, AoE heal through it.