Xenoanalyst II

Things to Know

Group Composition

Recommended: The recommended group composition for 8 person story is 2 tanks and 2 healers.

I’m Crazy, So Why Not? Story mode Xeno can be completed with 1 tank, 1 healer and the rest DPS. It can also be undermanned with 1 tank, 1 healer and 4 other DPS. At least 6 players are required due to console lockouts.

Recommended: The recommended 16 person story group composition incudes 2 tanks, 3 healers and 11 DPS.

I’m Crazy, So Why Not? This encounter can be completed with 1 tank, 2 healers and a minimum of 5 very strong DPS.

Recommended: A full group of players with the standard 2 tank, 2 healer and 4 DPS composition is recommended due to increased spike damage and DPS requirements.

I’m Crazy, So Why Not? Veteran mode 8 person Xeno can be completed with 6 people, including 1 tank (shadow/assassin recommended), 1 healer and 4 very DPS. Note that the lost 13k DPS of two absent players must be picked up by the rest of the group.

Recommended: A group composition of 2 tanks, 3 healers and 11 DPS is recommended for 16 person veteran mode.

I’m Crazy, So Why Not? Veteran mode 16 person Xeno can be completed with as few ast 12-13 people due to reduced individual DPS checks in larger groups. One tank (two suggested), two healers can make a viable and the rest DPS can make a viable go at completion provided the DPS check is met.

Unique Drops

Xenoanalyst is available during the Relics of the Gree conquest event only, and as such rewards select faction currencies and reputation rewards. Additionally, it also has a chance to drop a rare mount.

The boss, like most event bosses, drops Gree Enclave reputation tokens to increase your standing with that faction.

Xeno drops several Gray Helix Components, a faction currency for the Gree Enclave. Note that these items are required if you wish to craft Nightmare Crystals, a consumable that boosts your stats and performance for a set time in master mode operations. These items can also be used to purchase legacy gear, pets, decorations, mounts and more.

More components drop per person in 16 person groups than in 8 person, and more drop in veteran than they do in story mode.

The Red Secant Mount is one of the rarest in the game and has a minor chance to drop in Xenoanalyst encounters. Good luck in your hunt for it!

Xenoanalyst has a one-time mission associated with it. You can pick it up by purchasing the Gray Secant Authorization from the Gree reputation vendor on Ilum, and then visiting the nearby mission terminal. This is only available once per character. It will not reset each event.

Let’s Talk Numbers

DPS checks for game update 6.0+:

  • 8 Person Story: 3,497 DPS
  • 16 Person Story: 3,001 DPS
  • 8 Person Veteran: 6,848 DPS
  • 16 Person Veteran: 5,617 DPS

Xenoanalyst is not bolstered, so under-leveled or very-under geared characters will likely struggle with staying alive and doing much damage.

Tactics

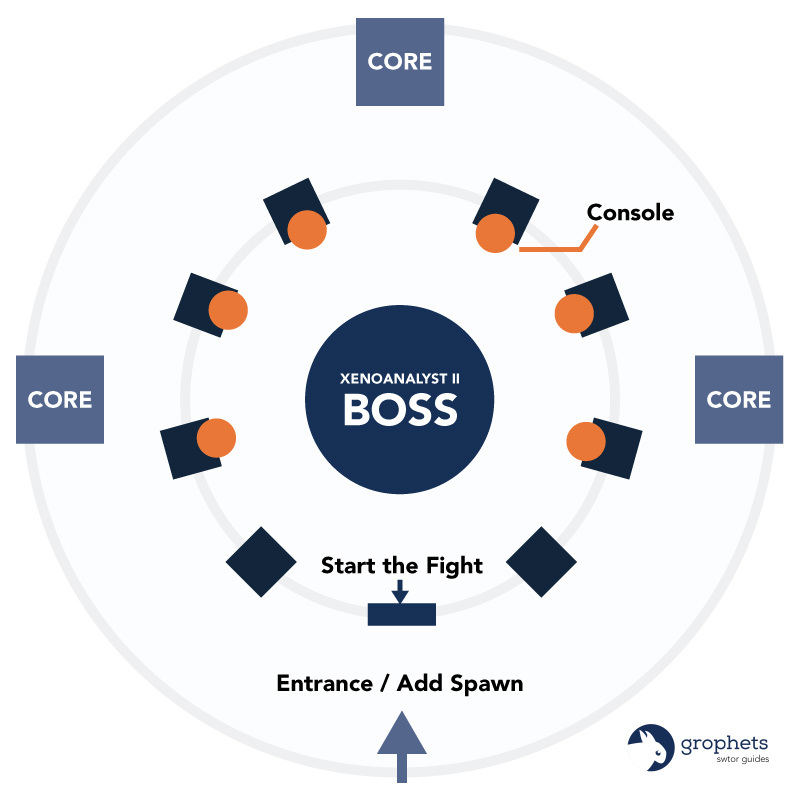
Phase I: Starting the Encounter

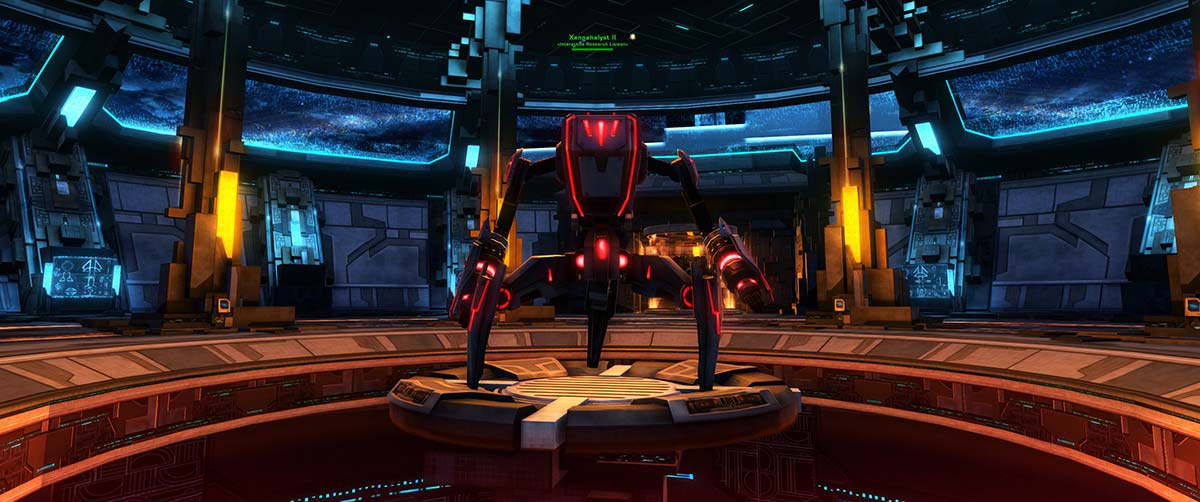
Xenoanalyst II is a friendly NPC when you first enter the room. Begin the encounter by clicking Participant Registration Panel in front of the boss. When clicked, an 8 second and then 15 second channel will begin as Xenoanalyst II assesses the group’s strength and prepares its experiment. If you wipe on the boss and respawn within the room, the panel will not be clickable. By that point, the boss will remain an enemy.

Phase II: Mechanic Execution

Most of this encounter is all about managing the core mechanics of dropping the boss’ shield by clicking on 6 consoles, killing cores, dealing with adds, and successfully completing a tank swap after Thermal Tolerance. Mechanics occur up until burn in a predictable cycle of:

  1. Shield break (Problematic Solving Equation)
  2. Tank swap (Thermal Tolerance)
  3. Cores (Environmental Awareness)
  4. Adds (Species Comparison)

Here’s a quick overview of how to deal with each cycle (see tips to the left for some additional advice):

  • When Xenoanalyst uses Problematic Solving Equation, click on the consoles on the pillars around the room. There are 6 consoles total (two pillars nearest entrance have no consoles) and they glow purple when players can interact with them. You’re limited to clicking on a single console due to a debuff that locks you out. The shield channel lasts 90 seconds so you can use the downtime to heal up and stake stock of the group. Expect a raid-wide AoE after.
  • Thermal Tolerance marks a required tank swap. You may taunt during the end of the cast or, ideally, interrupt the channel (line of sight or stealth out) and allow the off tank to taunt. Expect spike healing during this period. In veteran mode, this applies 90 second debuff.
  • Whenever Xeno casts Environmental Awareness, it will stop attacking and start a 30 second channel. A faint blue beam will connect it to one of three cores around the room. Kill the core within the 30 second .
  • Whenever Xenoanalyst casts Species Comparison (after dealing with cores), adds will spawn at the entrance. The first wave is a group of four Akk Dogs. The second wave consists of four Terenteks. The third wave (which is rare in story mode, but typical in most veteran mode groups) is a single rancor, which must be kited by the off-tank until it is dead.

Phase III: Burn

The group enters burn when Xenoanalyst reaches 17% health. At this point, the boss will shield for a short time while channeling Loading Final Evaluation for 15 seconds. Once complete, it will start using Generate Urgency on players every 3 seconds. Tanks should allow this attack to cycle through all players if they have no Force/Tech or damage reduction defensives available to hold the boss under a taunt. In that case, healers must keep everyone topped up. Use raid buffs and otherwise kill the boss quickly.

Diagram of the Xenoanalyst encounter

Tips for dealing with…

During Problematic Solving Equation:

  • DPS (and healers) must click on glowing panels (indicated by orange circles above) to end his 90 second channel.
  • The following AoE damage (caused by Problematic Energy Eruption) can be line of sighted behind pillars.
  • The AoE damage of Problematic Energy Eruption is Force/Tech > Elemental damage.
  • The tank on the boss should NOT line of sight during this period.
  • The console lockout debuff lasts for 30 seconds. As such, if you have clicked a panel during that channel, you will be unable to do so again until the next shield.
  • If dealing with add spawns, click all but one panel, clean up adds, then click the panel.
  • Pull off a stealth revive during this time if needed.

After consoles are used, Xenoanalyst will cast Thermal Tolerance on the main tank. This 10 second channel can be interrupted in one of two ways:

  • Line of sight the boss behind a pillar (tank must leap back into the fight immediately after interruption else the boss will start using AoE attacks).
  • If a shadow/assassin, stealth out at the start of the channel.

In veteran mode, Thermal Tolerance leaves a crippling debuff called Severe Burns on the main tank if not interrupted. Severe Burns increases damage taken by 20% per stack, for up to a total of 10 stacks. The debuff lasts 90 seconds. Therefore you should NEVER solo tank this fight in veteran mode unless your main tank is a skilled shadow/assassin.

If an off-tank is available, this is the point at which a tank swap occurs. Ensure your taunts are available.

Once Thermal Tolerance ends, Environmental Awareness – or killing the data cores – will need to be dealt with. Here are some suggestions:

  • In story mode, the group has the option to kill the core, which is now unshielded, within those 30 seconds or ignore it and continue DPS’ing the boss through its damage reduction shield.
  • In veteran mode, cores MUST be dealt with else you will wipe. They have more health and thus need strong DPS to make the check. We recommend leaving 1 melee DPS on the boss to whittle down its health more while the rest of the DPS deal with killing the core.

If the core is successfully downed before the 30 second channel ends, the boss will be stunned for 12 seconds and the group will have time to deal additional damage. Cores will do a knockback upon being killed.

If a core is not killed in 30 seconds, Xenoanalyst will shoot a random player with Negative Reinforcement.

Once the cores are killed, you will enter Species Comparison phase. A group of adds will spawn at the entrance. The off-tank should AoE taunt them and bring them to the boss (unless it is a rancor). Once the adds are down, click the consoles to drop the Problematic Solving Equation field and start the cycle over again until burn.

Possible add spawns include:

  • Wave 1: 4 Akk Dogs (Simulated Akkbeast) or 4 Jawas (Digitized Creature Jawa).
  • Wave 2: Terentatek (Simulated Terentatek)
  • Wave 3: Rancor (Simulated Rancor) – many attacks are AoEs. Kite it and burn it from range.

Once the group reaches burn phase, Xenoanalyst’s Execute! ability does a very large single-target hit and includes a threat drop. Expect the boss to swap from target to target – this is okay, and even supported, given it spreads out damage rather than allowing a single player to take multiple hits. No one except a tank can take two hits of Execute in a row. Use raid buffs, gather in the center for easy AoE healing. Avoid having tanks taunt on cooldown UNLESS they have strong defensives available. Else, players that are hit should use a defensive to ensure any follow-up attacks don’t kill them.

Veteran Mode Changes

  • Cores cannot be skipped, though you can leave 1 DPS on the boss to continue pushing it.
  • Thermal Tolerance leaves a painful 90 second stacking debuff on tanks mandating a tank swap.
  • The enrage timer is 8 minutes (instead of 10 in story mode).
  • You are guaranteed to get a Rancor add in wave 3 (unless you reach burn prior to the third use of Species Comparison).

Role Tips

What you should know if you’re playing a Tank, DPS or Healer in this fight.

  • Shadow/Assassin tanks can stealth out at the start of Thermal Tolerance. Do it quick enough and you won’t even gain a stack of the Severe Burns debuff.
  • Many of the boss’s attacks are dependent upon line of sight. That said, never allow the main tank to actively LoS the boss or AoE damage will hit the group.
  • The boss’ attacks are largely typeless damage, but can be mitigated by defensives that help with Force/Tech attacks.
  • During burn phase, don’t keep the boss on you full time unless you have a defensive active. All attacks during that phase are Force/Tech. Taunting and taking multiple hits without a defensive is a quick way to die. Allow the boss to do a couple hits on high health players one by one, then take it for the next few (about 2 hits, 1 per each 3 second channel) with a defensive up. Healers will work on keeping everyone alive while you mitigate most damage. Then allow the boss to swap off to DPS that were not yet hit or have your fellow tank taunt and also take a few hits with a defensive up. The goal is to spread out damage while also NOT allowing DPS or healers to take two hits in a row.
  • Work on target swapping in order to maximize your up time. You will have not only the boss to damage, but also Data Cores, adds as well as be required to click on panels. As such you want to avoid DPS’ing the boss through its Problematic Solving Equation shield (it is immune) and execute the mechanic required during that phase.
  • You will likely take large hits during burn – be prepared with a defensive.
  • Only defensives that mitigate Force/Tech damage or absorb damage will work with most of Xeno’s attacks. That said, if you are targeted by Generate Urgency (the burn phase attack), defensives like Force Barrier and the like will NOT work as the attack sets your tech resistance to -100%. This eliminates any benefit to select defensive abilities that work by boosting resistance. Abilities that reduce overall damage taken, absorb damage, increase shield or absorb chance, or increase defense chance still work.
  • Have the group stack together for regular AoE heals just after adds, bringing down shield and during burn.
  • Prepare for massive spike healing on the tanks during Thermal Tolerance periods. As the channel goes on, tanks will take more and more damage (particularly on veteran mode).
  • Assist with console clicking and DPS as needed.

Damage Profile

  • Skill Name: Thermal Tolerance
  • Damage Type: Force/Tech > Elemental
  • Frequency: Up to every 1 minute 15 seconds, though it occurs on a set timer (after core phase). The channel lasts for 10 seconds and it ticks for damage every second.
  • Damage Spread: Single target. Applies +20% damage taken debuff (up to 10 stacks) in veteran mode.
  • How to Defend: Interrupt the skill by line of sighting the boss or stealthing out during the channel. This is a required tank swap in veteran mode. No debuff is applied in story mode and the tank will only need spike healing.

  • Skill Name: Generate Urgency
  • Damage Type: Force/Tech > Typeless
  • Frequency: 3 second cast with no cooldown. This ability only occurs during burn phase.
  • Damage Spread: Single target. Includes a threat drop and will move to the next highest threat player.
  • How to Defend: Utilize absorb, damage reduction, force/tech or shield defensives. Things like resilience/shroud, saber reflect and more will work.
  • Skill Name: Negative Reinforcement
  • Damage Type: Typeless
  • Frequency: After a core failure
  • Damage Spread: Single target, random
  • How to Defend: Be high health or use an absorb shield after a core is failed (often deliberately so on story mode).

  • Skill Name: Problematic Energy Eruption
  • Damage Type: Force/Tech > Elemental
  • Frequency: Occurs after every Problematic Invulnerability Shield is broken by using consoles.
  • Damage Spread: This is an AoE attack that can be line of sighted.
  • How to Defend: Line of sight the attack or use a moderate absorb defensive (such as force armor/static barrier or shield probe). This AoE deals only minor damage and everyone should group up for heaing afterward.

Explain This to Others

Story Mode Directions

Welcome to Xenoanalyst! Let’s have DPS pick and stand by their pillar. You’ll be clicking on the console there whenever the boss has a shield up. They light up purple. You can only use it once per shield phase.

Whenever we’re not dealing with consoles, stack in the middle to maximize AoE healing.

Once we click on the blue panel in front of the boss, we’ll begin the fight. Xeno will do a couple short channels and we’ll have about 24 seconds before we need to hit the purple consoles and actually attack.

When the boss has a gold shield, it is immune to damage and DPS need to click the purple consoles. Dropping the shield hits the group with a minor AoE attack. You can LoS it behind a pillar but gathering in the center for AoE heals works too.

Following shield phases, tanks handle Thermal Tolerance, a 10 second channel that deals major spike damage. Defensives that reduce damage taken (energy shield) or mitigate Force/Tech damage (resilience/shroud or saber reflect) will help.

Tanks can use a Force/Tech defensive; Shadow/Assassin tanks can stealth out at the start of the channel (be sure to taunt the boss back); and ALL tanks can interrupt the channel by LoS’ing the boss around a pillar. Rejoin the group ASAP.

Healers should put big heals on the tank during Thermal Tolerance. After, we deal with cores, which is the Environmental Awareness phase.

We can either kill the core or ignore it. If we kill, must do so in 30 seconds. The boss will be connected to one of the three cores by a faint blue line – that’s the one we attack.

Else, we can simply continue DPSing the boss in the middle even though it takes reduced damage. The boss will do a large attack called Negative Reinforcement on one player for failing the phase, but we won’t wipe. Just stay stacked up for heals.

After cores, adds spawn (Species Comparison). Stop DPS’ing the boss (it’s shielded), click all but one purple console, and kill the adds that spawn by the entrance. Once the adds are dead, click the last console, group up, and continue.

We’ll repeat these phases until we reach burn at 17% health. The boss shield while loading its Final Evaluation. When the shield drops, use raid buffs and kill it as quickly as possible.

It will attack a random player and drop threat every 3 seconds. It’s okay for DPS and healers to take 1 hit of this. It’s not okay to take 2 in a row.

If a tank is taunting to take multiple hits, keep a Force/Tech or damage reduction defensive up. Else simply allow the boss to cycle through and taunt when you have defensives available. We do that until the fight is over.

Veteran Mode Directions

Welcome to Xenoanalyst! Let’s have DPS pick and stand by their pillar. You’ll be clicking on the console there whenever the boss has a shield up. They light up purple. You can only use it once per shield phase.

Whenever we’re not dealing with consoles, stack in the middle to maximize AoE healing.

Once we click on the blue panel in front of the boss, we’ll begin the fight. Xeno will do a couple short channels and we’ll have about 24 seconds before we need to hit the purple consoles and actually attack.

When the boss has a gold shield, it is immune to damage and DPS need to click the purple consoles. Dropping the shield hits the group with a minor AoE attack. You can LoS it behind a pillar but gathering in the center for AoE heals works too.

Following shield phases, tanks handle Thermal Tolerance, a 10 second channel that deals major spike damage. Defensives that reduce damage taken (energy shield) or mitigate Force/Tech damage (resilience/shroud or saber reflect) will help.

Tanks can use a Force/Tech defensive; Shadow/Assassin tanks can stealth out at the start of the channel (be sure to taunt the boss back); and ALL tanks can interrupt the channel by LoS’ing the boss around a pillar. Rejoin the group ASAP.

Thermal Tolerance applies a 90s stacking debuff (+20% damage taken per stack, up to 10 stacks) to the tank for each second of channel time. This mandates a tank swap. The off tank can taunt any time during the channel.

Healers, be ready for Thermal Tolerance and put big heals on the tank!

Next, we deal with cores (Environmental Awareness). We must kill the core within 30 seconds or wipe. Target the unshielded core connected to the boss by a faint blue line. One DPS can stay on the boss while the rest kill the core.

After cores, we deal with adds. When Species Comparison occurs, the boss will be shielded with a gold shield again. Stop DPS’ing Xeno, click all but one purple console, and kill the adds that spawn by the entrance.

Wave 1 is Akk Dogs (or Jawas). Wave 2 is Terentateks. Wave 3 is 1 rancor that MUST be kited by the off tank. Once the adds are dead, group up, click the last console, and continue damaging the boss. We want to do this as quickly as possible.

We’ll repeat these phases until we reach burn at 17% health. The boss shield while loading its Final Evaluation. When the shield drops, use raid buffs and kill it as quickly as possible.

It will attack a random player and drop threat every 3 seconds. It’s okay for DPS and healers to take 1 hit of this. It’s not okay to take 2 in a row.

If a tank is taunting to take multiple hits, keep a Force/Tech or damage reduction defensive up. Else simply allow the boss to cycle through and taunt when you have defensives available. We do that until the fight is over.

Hard enrage is at 8 minutes.

Additional Resources

Find More Ops Guides At

Authored by Erani
Authored by Erani

Hi, I’m Erani. I’m just a random gamer with an out of control fiery grophet collection. With the help of some amazing friends, I seek to make SWTOR content more accessible. Here’s to gamers of all shapes, sizes and creeds kicking butt.

Help, input and feedback was provided by:

  • Khazad Sanci for providing DPS check information and the original iteration of the handy encounter diagram. Thanks!
  • Maffiss for dying through God Bubble when hit with Generate Urgency. Science!

Leave a Reply

Your email address will not be published. Required fields are marked *

This site uses Akismet to reduce spam. Learn how your comment data is processed.