
Navigate
Overview
Enrage Timer: 8 minutes
When should I use raid buffs?: Up front and off cooldown
Which roles have the hardest job? Tanks and Healers
Location: Section X, Belsavis
Boss Level: 50
Unique features: Dreadtooth comes in 4 difficulties and has 4 associated achievements with killing it at those difficulties. Termed “stacks,” buffing the boss by applying Dreadful Essence – a unique drop gained when killing the boss – increases his health, increases loot drop value, and, at 5 and 10, adds mechanics.
Things to Know
Group Composition
Unique Drops
Dreathtooth drops four unique items, depending on the number of stacks/difficulty.
Increasing Difficulty
Dreadtooth comes in four flavors: 1, 3, 5 and 10 stack. By applying the unique item called Dreadful Essence to the boss, players can increase the difficulty and damage of the boss, as well as the types and quantities of items that killing the boss rewards. Mechanics at 1 and 3 stacks are identical, but easier than mechanics at 5 and 10 stacks, which are also identical.
Each difficulty is called by a different name: Dreadtooth (1 stack), Corrupted (3 stack), Frenzied (5 stack) and Nightmarish (10 stack). The average group can succeed with 1 and 3 stack, while only the most skilled players should attempt 5 and 10 stack.
Encounter Setup
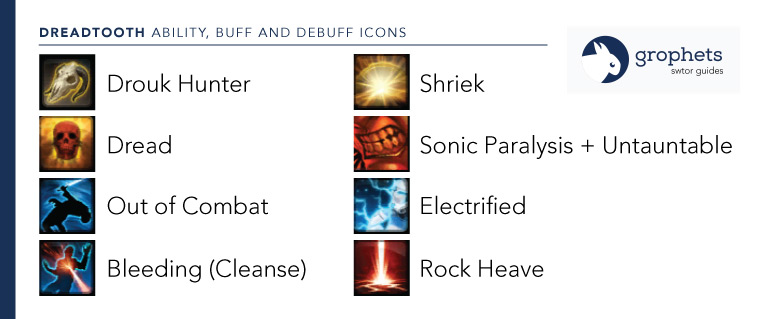
Drouk Hunter Buff
- Ensure your entire group is within 100 meters of the boss before you engage, else they will not receive the Drouk Hunter debuff.
- Engaging Dreadtooth applies an 8 minute long debuff to your raid group called Drouk Hunter. This allows you to survive the encounter for the duration, after which the boss will enrage.
- Any players outside the raid group cannot engage Dreadtooth without dying, as they will not have the Drouk Hunter buff. This makes support groups impossible.
- Hitting enrage (having Drouk Hunter expire) will cause Dreadtooth to one-shot the group. All players surviving at that point will be instantly killed and will receive a 5 minute debuff called Dread that prevents them from re-engaging as it prevents Drouk Hunter from being applied. It is better to /stuck before enrage if you know your group will fail the DPS check. Players that are dead prior to this will not gain Dread. Dread has a 500 meter range.
Reviving
- Combat revives are an option, though you must use it wisely due to the 5 minute cooldown. A combat revive will restore the Drouk Hunter debuff. Save combat revives for tanks.
- Stealth revives or chain revives are impossible to pull off due to the raid wide damage going out on a frequent basis, but in theory would also restore the Drouk Hunter debuff.
- Remaining out of combat for 3 minutes or more will result in the Drouk Hunter debuff falling off and not appearing even after combat revive.
- Reviving at med center and running back to the encounter will result in the Drouk Hunter debuff falling off.
1 and 3 Stack Dreadtooth
Mechanics
The main tank should place their back to a wall while tanking Dreadtooth. A threat drop will occur after Sonic Paralysis unless the tank uses a stun break. Tanks can typically stun break every other Sonic Paralysis, so an off-tank can stand to the side and AoE taunt at the end of the channel to grab the boss’s attention as the skill ends. Single target taunting is disabled. This will prevent the boss from turning and targeting the highest threat DPS.
Melee DPS should never stand under or in front of the boss and tanks should never stack up due to conals and AoE attacks centered on Dreadtooth’s target.
Phase I
A few ranged should be in the back for Phase 1 to kite circles, while everyone else stays near mid-range, but somewhat spread out. Healers should keep anyone who gets the Rock Toss debuff cleansed.
Phase II
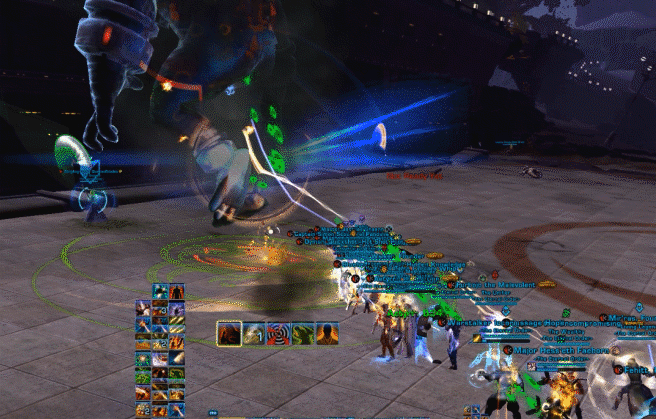
Everyone should stack up during Shriek for AoE heals, then spread out to avoid Ground Spike which are indicated by red circles on the ground.
Differences Between 1 and 3 Stack
There are no mechanic differences between 1 and 3 stacks. However, 1 and 2 stacks is balanced for an 8 person group, while 3 or more stacks are balanced for 16 person groups.
Abilities
- Sonic Paralysis: 5 second channel that deals damage and stuns tank. Only occurs sub 75%.
- Backhand: Knocks back and knocks down tank. Only occurs sub 75%, usually right after Sonic Paralysis. Can be dodged, so sometimes won’t appear to occur.
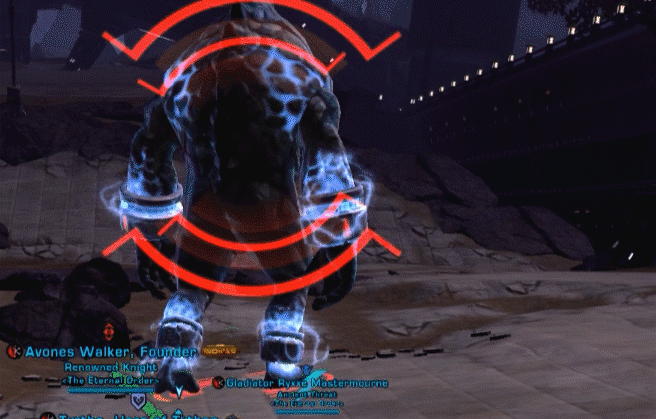
- Rock Heave: 4 sec cast that places a red circle under the tank.
- Phase I (pre-50%):
- Rock Toss: Deals damage to the furthest player(s) from the boss, and places a cleansable DoT on them.
- Smash: AoE that deals moderate damage and knocks all players into the air.
- Phase II (sub-50%):
- Shriek: 6 second channel dealing raid-wide damage. 45s cd.
- Ground Spike: Places red circles on random raid members. After a few seconds, a spike of rock will shoot up from the ground to deal massive damage to anyone caught inside, and place a cleansable DoT on them.
- Rock Toss: Same as phase 1 Rock Toss, but can target any raid member.
- Smash: No longer occurs.


5 and 10 Stack Dreadtooth
Mechanics
There are a few changes to mechanics for 5 stack Dreadtooth that must be executed properly. Additionally, Dreadtooth will now have considerably more health, and deal much more damage.
Tank Swap: The Smashed debuff means that tanks must now perform a swap. There are two ways this can occur. First, a full tank swap can be performed, where the main tank holds the boss until (if) Backhand occurs, then the off tank grabs the boss. Second, the off tank can grab the boss after sonic paralysis until they get Smashed, and then the main tank can take the boss back. Due to the forced tank swap and the inability to revive players beyond a single combat revive (reviving at the medical center causes you to lost the Drouk Hunter debuff), it is recommended to have an extra (third) tank to take over in case one dies. For details on how to perform the tank swap, refer to Role Tips below.
Phase II Additions
Stopping DPS: DPS and tanks must be careful to watch for the shriek channel once the boss is 50% health and below. As as soon as it is completed, the boss will gain the electrified buff for 9 seconds. DPS who are good at managing actions and travel time can keep casting through Shriek for the extra damage, but generally everyone should stop attacking during shriek, and not attack until after the electrified buff falls off. During Shriek, players should also try to use a defensive and stack up, as the outgoing damage is increased significantly.
Differences Between 5 and 10 Stack
There are no mechanic differences between 5 and 10 stack Dreadtooth. However, Dreadtooth now has more health and deals more damage.
Abilities
Mechanics (in addition to those on 1 and 3 stack):
- Smashed: Backhand, if not completely dodged, will apply the Smashed debuff, which causes the target to take more damage from Dreadtooth’s cleave and Rock toss.
- Rock Heave: No longer has a castbar.
- Phase II (sub-50%):
- Shriek: Now has a 30 sec cooldown.
- Electrified: Following Shriek, places a 9 sec buff on Dreadtooth that reflects any damage dealt. Stop DPS partway through shriek.


Role Tips
What you should know if you’re playing a Tank, DPS or Healer in this fight.
Damage Profile
- Skill Name: Sonic Paralysis
- Damage Type: Force/Tech > Kinetic Damage
- Frequency: Starts at 75%
- Damage Spread: Single target channel that stuns tank.
- How to Defend: Reflects will work here, and we recommend the stun be broken using a stun break. If your stun break is on cooldown, swap with a fellow tank. If you don’t have another tank, boss will turn to next highest threat after the skill concludes.
- Skill Name: Rock Toss
- Damage Type: Force/Tech > Elemental
- Frequency: Every 15s up until 50%, and then every 6 seconds.
- Damage Spread: Damages player furthest from boss through 50%, and then random players. Leaves a debuff that should be cleansed.
- How to Defend: It’s impossible to predict the target, so keep up rotational defensives and damage reduction abilities/buffs as often as possible, and cleanse the Bleeding debuff applied immediately. Single-target healing will be required after a player is hit with this ability. If cleanses are in short supply, it can be absorbed in 1 and 3 stack. In 5 and 10 stack, the debuff MUST be cleansed. Self-cleanses and purges will work.
- Skill Name: Electrified
- Damage Type: Force/Tech > Energy
- Frequency: 9 seconds long, occurs after Shriek ends on 5 and 10 stack Dreadtooth.
- Damage Spread: Anyone who attacks the boss. Does not damage players who already have DoTs ticking on the boss because they are all purged, but will damage if those DoTs are reapplied.
- How to Defend: Simply don’t attack. Else, use a strong absorb shield or a defensive that works against Energy attacks. Most strong attacks during this period will result in a one-shot kill.
- Skill Name: Backhand Smash
- Damage Type: Melee/Ranged > Melee
- Frequency: Starts at 75%, tends to occur after Sonic Paralysis. Can be dodged.
- Damage Spread: Single target, includes a knockback and stun. If doing 5 or 10 stack, this ability applies Smashed and forces a tank swap. Smashed debuff lasts 30 seconds.
- How to Defend: Melee/Ranged defensives help mitigate the damage of this attack following the end of Sonic Paralysis. Additionally, any skills that increase your health or shield chance will assist mitigating follow-up attacks if the tank swap or healing is slow to occur.
- Skill Name: Shriek
- Damage Type: Force/Tech > Kinetic
- Frequency: (1-3 Stack) Every 45 seconds. (5-10 stack) Every 30 seconds. Starts when the boss reaches 50% health.
- Damage Spread: Deals raid wide damage.
- How to Defend: Group up for AoE heals and use absorb shields. For 1 and 3 stack, Shriek never does enough damage if the group is in good health to warrant a stronger defensive. For 5 and 10 stack, DPS and healers must use low-grade defensives (such as absorb shields) and stack up for AoE healing for the duration of the cast. Note that this occurs just before Electrified in 5 and 10 stack so you can call for DPS to stop while the group tries to survive. AoE damage reduction utilities (and skills) are a must.
- Skill Name: Ground Spike
- Damage Type: Force/Tech > Elemental
- Frequency: Starts at 50% health and can go out up to every 6 seconds.
- Damage Spread: Tends to target players 20 to 70 meters out. If none are present, any players in 70 meters may be targeted. Any players in the red circle will take damage.
- How to Defend: Simply step out of the red circle. Snipers and Gunslingers can use entrench on 1 and 3 stack. On 5 and 10 stack, never try to stand in the circle. Cleanse the Bleeding debuff that results.